Hooked Creationz

Bookmarks! Toys! Accessories! And More!!!

Archive for the category “Patterns”

Clover Doily

It took me quite some time to finish it, but here is my newly completed Clover Doily.

I have yet to straighten and stiffen the piece but, as is, it measures 25 by 31 inches.

I followed Tat-a-Renda’s pattern but I excluded the smaller motifs that she adds between the larger ones and around the edge of the finished piece. I like the airiness of this version a little better than her original. (I recommend you go check out her blog, as

I absolutely loved working on it! Which is probably why it took me way longer to finish than it should have. I enjoyed the process so much, I didn’t want it to end. The motifs are very easy to make and very repetitive so it was easy for me to work on it while watching TV, travelling, etc. The motifs can be joined together gradually, or they can be sewn together at the end. I chose to join them as I worked through the piece, to minimize the amount of extra work and extra thread needed to sew them after the fact.

Pumpkins Pattern

I have just completed a new pattern, just in time for fall.

DSC_4718

These pumpkins are great decorative touch for the home throughout the fall season.

The pattern is versatile and can be easily modified to make different sized pumpkins in many colour combinations.

Enjoy!

Ravelry Store

Due to the fact that Zibbet decided to quit being a free marketplace, a gesture that somewhat disappointed me, I have decided to look for other mediums to sell my crochet creations and patterns.

I’m not sure why I haven’t previously thought of Ravelry for selling my patterns, even though I’ve been an active member for years. There are no fees if your shop sales are under $30, and even if they go over that amount their cut is a small percentage of how much you sell.

So here‘s the link to my new Ravelry store.

As for my actual handmade creations, I have yet to decide how to go about selling them. I am currently researching online marketplaces with no upfront listing fees.

Free Pattern – Christmas Present Pillow

As promised in my previous post, here’s the pattern for the Christmas Present Pillow, albeit a little late. This pattern can also be found as a free PDF download on Ravelry.

Notes:

  • This pattern creates a square pillow 16″x16″ by using a pillow form with those dimensions. Changing the hook size and/or yarn might require changing the number of stitches. Keep a measuring tape handy and double check as you move along.
  • For this project, I used a 4.5 mm crochet hook and Red Heart Comfort yarn. If you’re using a different yarn, you can adjust the hook accordingly but keep in mind that a tight stitch is desirable for this project so the white pillow form doesn’t show through.
  • I chose to sew shut the pillow cover. If you prefer using a zipper or buttons, you may do so.

Materials:

  • Red yarn
  • White yarn
  • 4.5 mm crochet hook (or another hook that matches your yarn)
  • Pillow form 16″x16″
  • Yarn needle
  • Measuring tape

Pillow cover:

  1. With red yarn ch 62.
  2. Sc  in the second chain from the hook, sc in each of the following chains until the end of the row. Ch 1 and turn.
  3. Repeat row 2 above until the piece measures 32″ long. Finish off.
  4. Fold the pillow cover and sew the edges first. ChristmasPillow-15-1
  5. Place the form inside the cover and then sew the remaining opening. I keep the opening in the middle of the pillow like this because it will eventually be covered by the crisscrossed white bands.ChristmasPillow-16
  6. The pillow cover is now complete.

ChristmasPillow-17

White bands (make 2):

  1. With white yarn ch 123 and join to form a circle which making sure not to twist the chain. The chain should fit around the pillow.ChristmasPillow-19
  2. Sc in each of the following chains around the circle. The piece is worked in the round, do not join.
  3. When you have completed 6 rows, finish off.
  4. Repeat the instructions above for the second piece.
  5. Place the white bands on the pillow creating a cross.

Bow:

  1. With white ch 141.
  2. Sc in second chain from the hook and in the remaining chains until the end of the row. Ch 1 and turn.
  3. Sc in each in each sc, sc2tog for the last 2 sc in the row. Ch 1 and turn.
  4. Repeat row 3 above until the piece has 8 rows. Finish off.
  5. Attach red yarn to a any stitch around the edge and sc evenly around making a border. Finish off.
  6. Fold the piece to make a bow and attach it to the center of the pillow.

The finished product should look something like this:

ChristmasPillow-21

Colourful Flower Trivet/Potholder – FREE PATTERN

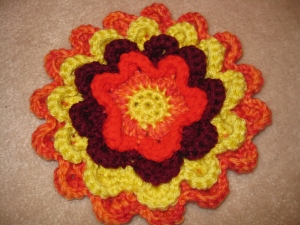
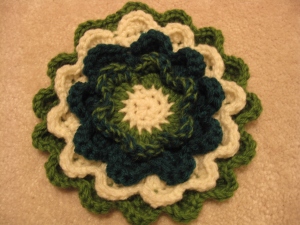
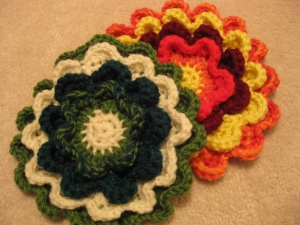
Add some colour to your kitchen with this great Colourful Flower Trivet/Potholder. It’s easy to make and you can use any colours you like. For a more simple look, you can choose only one colour throughout.

Please note: I did not include any colour changes in the pattern. Also, I apologize for the low quality pictures – I will have better ones up in a few days.

For this project, the type of yarn, hook size, or gauge is not important.

Rnd 1: Using the magic circle, work 8 sc in the center. (8)

Rnd 2: Ch 1, 1 sc in the first sc, 2 sc in each st around. Sl st into the first sc to join. (15)

Rnd 3: Ch 3 (will count as a dc). Dc in the same st, 2 dc in each st around. Sl st into the top of the ch 3 to join. (30)

Rnd 4: Ch 1. Sc in the same st. *Hdc in front loop of next st, 4 dc in front loop of nest st, hdc in front loop of next st, sc in front loop of next 2 sts. Repeat from * around. Sl st in the first sc to join.

Rnd 5: Ch 3. This round is worked in the remaining back loops of Rnd 3. *2 dc in the next st, 1 dc in the next st. Repeat from * around. Sl st into the top of the ch 3 to join. (45)

Rnd 6: Ch 1. Sc in the same st. *Hdc in front loop of next st, 4 dc in front loop of nest st, hdc in front loop of next st, sc in front loop of next 2 sts. Repeat from * around. Sl st in the first sc to join.

Rnd 7: Ch 3. This round is worked in the remaining back loops of Rnd 5. 1 dc in the next st. *2 dc in the next st, 1 dc in the next 2 sts. Repeat from * around. Sl st into the top of the ch 3 to join. (60)

Rnd 8: Ch 1. Sc in the same st. *Hdc in front loop of next st, 4 dc in front loop of nest st, hdc in front loop of next st, sc in front loop of next 2 sts. Repeat from * around. Sl st in the first sc to join.

Rnd 9: Ch 3. This round is worked in the remaining back loops of Rnd 7. 1 dc in the next 2 sts. *2 dc in the next st, 1 dc in the next 3 sts. Repeat from * around. Sl st into the top of the ch 3 to join.

Rnd 10: Ch 1. Sc in the same st. *Hdc in front loop of next st, 4 dc in front loop of nest st, hdc in front loop of next st, sc in front loop of next 2 sts. Repeat from * around. Sl st in the first sc to join.

IMG_5000 IMG_5002 IMG_5003


Enjoy!

Miniature Speakers ***CROCHET PATTERN***

Miniature Crochet Speakers

Making the speaker box:

Materials:

2 ply acrylic yarn (black)

3.5 mm crochet hook

Polyfil stuffing

Square top (make 2)

  • Rnd 1: Ch 8
  • Rnd 2: Sc in second chain from the hook, sc in the next 6 chain spaces. Ch 1, turn
  • Rnd 3: *Sc in the first sc and in the next 6 sc. Ch 1, turn*
  • Next rounds: Repeat from * to * until your piece looks like a square. Depending on the type of yarn and the hook used, the number of rows needed to make a square may vary. With the yarn and hook that I used 7 rows were enough to produce the desired square piece.
  • Finish off. Weave in the ends and cut any excess yarn.

Rectangle side (make 4)

  • Rnd 1: Ch 8
  • Rnd 2: Sc in the second chain from the hook, sc in the next 6 chain spaces. Ch 1, turn.
  • Rnd 3: *Sc in the first sc and in the next 6 sc. Ch 1, turn*
  • Next rounds: Repeat from * to * until your piece looks like a rectangle. Depending on the type of yarn and the hook used, the number of rows needed to make the desired rectangle may vary.
  • Finish off. Weave in the ends and cut any excess yarn.

Connecting the pieces

  • Crochet the 6 pieces together using the black acrylic yarn.
  • You can choose to sew the pieces together but the edges of the box are more defined and straight when they are crocheted.
  • Before closing the box shut, stuff it with polyfil.


Making the round grills

Materials:

Bamboo yarn (black and grey)

3 mm crochet hook

Yarn needle or hot glue

Small circle

  • With black, make a magic circle
  • Rnd 1: Chain 1 and work 7 sc in the circle
  • Change to grey
  • Rnd 2: Work 2 sc in every sc around
  • Connect with a slip stitch to the first sc in the row. Finish off.
  • Weave in the ends and cut any excess yarn.

Large circle

  • With black, make a magic circle
  • Rnd 1: Chain 1 and work 7 sc in the circle
  • Rnd 2: Work 2 sc in every sc around
  • Change to grey
  • Rnd 3: Repeat *1 sc in first single crochet and 2 sc in the next sc* until the end of the round.
  • Connect with a slip stitch to the first sc in the row. Finish off.
  • Weave in the ends and cut any excess yarn.

Attaching the grills

  • Pick a rectangle side of the speaker box where you want to attach the speaker circles.
  • Follow the diagram below and either sew or glue the circles onto the box.

ENJOY!!


Uses for these little speakers:

~Hang them on the rear-view mirror in the car.
~Place them on your desk at home or at work.
~Have a audio-enthusiast friend? This would make a great gift for them.

Post Navigation